January 30, 2012

Paw Power!!!!!

When my friend Kristen came over we did our nails together. In the end her nails looked so good I decided to put them on my blog!
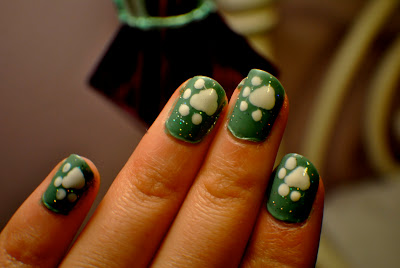
First she put on two coats of OPI "Mermaid Tears." After that she put one coat of small sparkles on all her nails.
Last she used a dotting tool and a white striper polish to make medium sized paw prints on every nail.
In the end her nails looked like this!
This design was inspired by an "IHaveACupcake" nail tutorial video. Click this link to check it out.
I think Kristen's nails turned out awesome! I hope you liked them, and I hope you try them out for yourself! Love!

January 27, 2012

Sprinkle Sparkle Nails

Winter ball is tomorrow so today I was in need for some beautiful, school dance worthy nails. I decided to go with a combination of OPI "Who Needs A Prince" and an Urban Outfitters polish that came in a paint palette pack. (P.S. Sorry I don't know the name of the Urban polish because when they come in a pack for some reason they don't put names on them...)
I applied my usual Nail Strengthener+Base coat combo and then I started my nails. For my base color I needed to apply three whole coats of "Who Needs A Prince" for it to become opaque but in the end it was worth it. This is how it looks on its own, a very pretty pearly pink.
 Next I applied one coat of the Urban Outfitters polish. After this I applied Seche Vite top coat and was done!
I hope you like these simple party/school dance inspired nails. Till next time! <3


January 23, 2012

Anchors Away!!!

Hi!!! I've been gone for a while but I'm back with a sailor themed nail design!
For this design I started with my usual Nail Magic Nail Strengthener, then CND Sticky Base coat, and finished with Seche Vite.
First I painted all my nails white except for my ring fingers. I painted my ring fingers with Orly "Blue Suede."
Then I used a red striping brush and OPI "Off With Her Red" to put four stripes on each of the white nails.
Next I started painting the anchor. I first put a dot near the top of my nail. Then drew a line straight down with a white striper and a curved line across the bottom. Next I drew a triangle on each side of the curved line, then a small line across the middle, and made a blue dot inside the white dot.

Last but not least I put some sparkles over every nail and finished with a top coat. This was the final product.
And just if your wondering these were all the products and tools I used.

Hope you liked the design and try it out for yourself. Love!